
This guide will demonstrate how to use the features of the Willamette University WUPrint system. This assumes you are using a computer that has already been configured to use WUPrint
View instructions on configuring your computer to use the system.
WUPrint is a Two-Step System:
Step 1. Sending Documents to the Network Queue
- Print as usual: When you are ready to print a document, go to File and choose Print from your application's main menu.
- From the list of printers, select your web printer (on lab computers, the printer name will be WUPrint; you can name the printer whatever you want on your personal computer(s)) and click Print or OK.
- NOTE: Nothing appears to happen. This is normal. If everything is working correctly your jobs have been sent to the Network Print Queue.
- Your Next Step is to log into the webprint site and release your print job(s) to the physical printer location of your choice. (hint, instructions below).
Step 2. Printing Jobs Stored in the Network Print Queue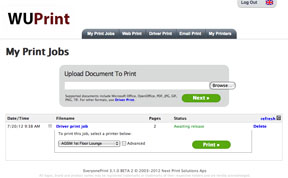
- In a web browser window, go to WuPrint (bookmark this page for future reference).
- You will be prompted to login with your Willamette network user name and password.
- The Willamette WUPrint window will appear.
- Select any jobs you wish to print by clicking the box next to the job name.
- Choose a printer from the Print To: list.
- Click the Print button.
- Your jobs are now sent to the printer. You should pick them up as soon as possible.
If you leave this window open and send more jobs to your queue, click the Refresh button to display the new jobs.
If you have any questions or need any assistance, contact the WITS Help Desk (x6767 or wits@willamette.edu)